SWUpdate bring up (I): Install to Yocto Linux and create single copy image
SWUpdate is a popular embedded system update framework. I’m trying to bring up a OTA update system on stm32mp1, and this OTA system will base on SWUpdate. This post records steps need to be done to install SWUpdate system into Yocto Linux, and create a single copy image to test it.
meta-swupdate
SWUpdate was provided to help generate SWUpdate supported images. Clone it to the layers path and add it into conf/bblayers.conf.
Notes:
This layer depends on several recipes in meta-openembedded. i.e. librsync and libubootenv. For STM32MP distribution, the default meta-openembedded version is too old and those recipes are not included yet. To continue, add those recipes manually or reset meta-openembedded to a newer version.
Boards related configs
SWUpdate defconfig
defconfig was required by swupdate.inc. Use menuconfig to create one for your boards as defconfig.
Notes:
If CONFIG_WEBSERVER and CONFIG_MONGOOSE was enabled in menuconfig, target boards will run a mongoose webserver so user can access it through <target_ip>:8080 by default
SWUpdate swupdate.cfg
swupdate.cfg will be copied to target as swupdate runtime configurations. In swupdate.cfg we can set board idendity,public-key,suricatta, webserver and even more:
1 | globals : |
09-swupdate-args
This file defines extra parameters for swupdate daemon.
1 | HARDWARE="stm32mp157a-cp:1.0" |
Here we specific hardware information thus SWUpdate daemon will check swu image hardware compatibility before updating. If user trying to use swu image without specific hardware compatibility, SWUpdate will refuse to update.
Use bbappend to add board related configs in
In boards specific layer, create file swupdate_%.bbappend:
1 | FILESEXTRAPATHS_append := "${THISDIR}/${PN}:" |
Now we have structure like this in boards specific layer:
1 | └── swupdate |
Install to image
Then we need to add swupdate, swupdate-www and libubootenv-bin into image.
1 | IMAGE_INSTALL_append = " swupdate swupdate-www libubootenv-bin" |
Flash the built image to target, make sure PC and target board are in same LAN, then we can access <target_ip>:8080 :

Create a single copy update image for test
Now it’s time to create a swu image to test SWUpdate system.
sw-description
sw-description defines the compatibility and usage of swu images. Here we defined a single copy update image, which is compatible with boards stm32mp157a-cp and will update target rootfs:
1 | software = |
Recipe for update image
To generate a swu file from bitbake, we need to create a recipe for update image. In my scenario it was named as cp-image-update.bb :
1 | DESCRIPTION = "SWUpdate compound image" |
Now we have structure like this in boards specific layer:
1 | . |
To generate swu image, call bitbake cp-image-update.
Generate update image without image recipe
Sometimes we want to generate a swu image for test purpose, in this scenario we can skip bitbake and use a simple shell script to generate swu image quickly:
1 |
|
Quick check structure of generated swu image
Since swu image was cpio based, we can use cat to check structure of it:
1 | cat cp-image-update-openstlinux-eglfs-stm32mp1-cp.swu | cpio -it |
Test with generated swu image on target
Use web interface
We can trigger update easily by uploading swu image through webserver:
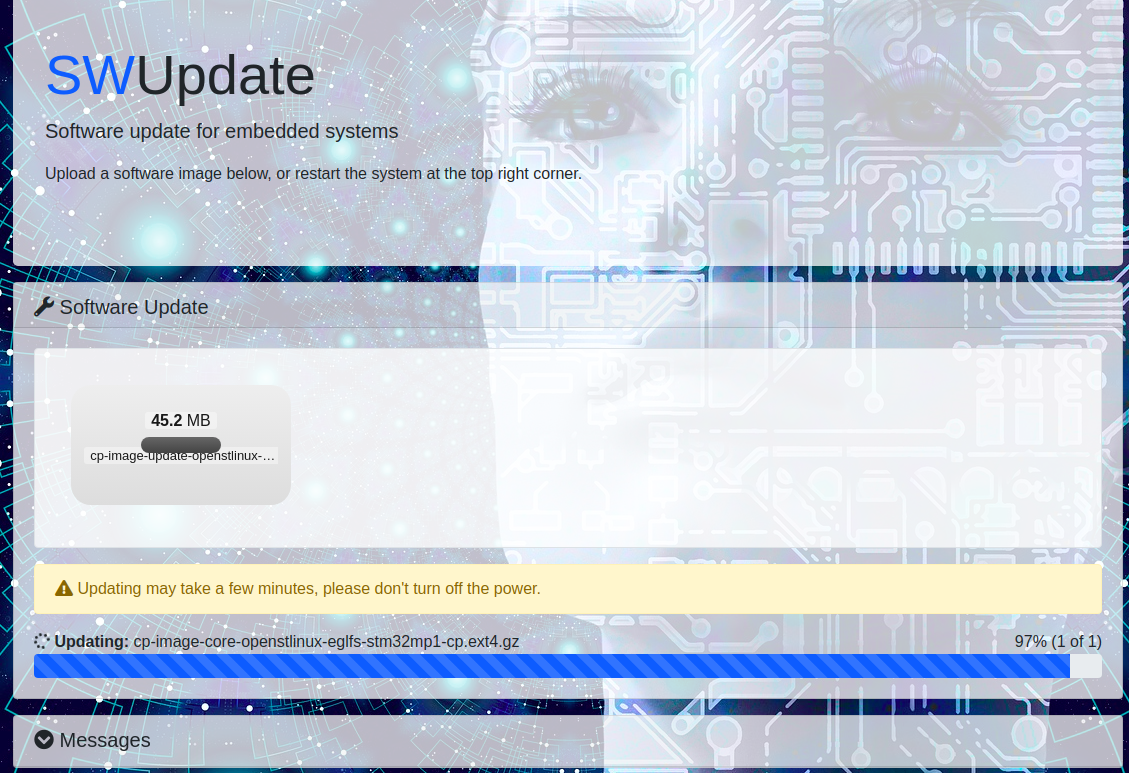
We defined postupdatecmd = "reboot"; in swupdate.cfg, so system will automatically reboot:

Use command line interface
We also can use command line to trigger update if we have an usb drive which contains swu image and has connected to target:
1 | swupdate -i /media/cp-image-update-openstlinux-eglfs-stm32mp1-cp.swu -H stm32mp157a-cp:1.0 |