i.MX 8 getting started: create your general layer
This post will tell you how to create your own general layer with a “hello world” app to be built into your EVK.
Before start, you should run setup-environment first.
Create your layer
Create layer example by bitbake-layers
Use bitbake-layers create-layer <layer name> to create a general layer example.
1 | $ cd imx-yocto-bsp/source # you also can create your layer in other path |
Notice: yocto-layer has been deprecated after Yocto 2.5. See yocto ref manual for more details.
The yocto-bsp, yocto-kernel, and yocto-layer scripts previously shipped with poky but not in OpenEmbedded-Core have been removed. These scripts are not maintained and are outdated. In many cases, they are also limited in scope. The bitbake-layers create-layer command is a direct replacement for yocto-layer
It will help you to create a layer with priority of 6. To change to other priority, add option “‐‐priority” or edit BBFILE_PRIORITY after creation.
Modification
Go to your layer path, add some stuff into your conf/layer.conf:
1 | IMAGE_INSTALL_append += "example" |
IMAGE_INSTALL_append will tell bitbake to install your app into image.
Notice: It’s required by Yocto Project Compatible version 2 standard to set LAYERSERIES_COMPAT. There will be a warning if you didn’t do so. see yocto ref manual for more details.
Note
Setting LAYERSERIES_COMPAT is required by the Yocto Project Compatible version 2 standard. The OpenEmbedded build system produces a warning if the variable is not set for any given layer.
Then add your source code:
1 | $ cd meta-alexlayer/recipes-example/example |
my example here :
1 | // alexhello.cpp |
Then modify your recipe file example_0.1.bb:
1 | SUMMARY = "bitbake-layers recipe" |
Notice: Here we use TARGET_CC_ARCH += “${LDFLAGS}” to avoid “No GNU_HASH in the elf binary” error when QA check, see mega-manual for more details.
25.10.8. Default Linker Hash Style Changed
The default linker hash style for gcc-cross is now “sysv” in order to catch recipes that are building software without using the OpenEmbedded LDFLAGS. This change could result in seeing some “No GNU_HASH in the elf binary” QA issues when building such recipes. You need to fix these recipes so that they use the expected LDFLAGS. Depending on how the software is built, the build system used by the software (e.g. a Makefile) might need to be patched. However, sometimes making this fix is as simple as adding the following to the recipe:
TARGET_CC_ARCH += "${LDFLAGS}"
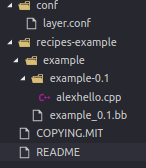
After those steps, you should have a folder like this:
Add your layer and build
There are two ways to add your layer into build:
Use bitbake-layers add-layer
Use bitbake-layers add-layer <layer name> to add a layer and build it. Before this, you should source setup-environment.
1 | $ bitbake-layers add-layer meta-alexlayer |
Modify script provided by nxp
Modify fsl-setup-release.sh, add your layer path to “BBLAYERS”:
1 | echo "BBLAYERS += \" \${BSPDIR}/sources/meta-qt5 \"" >> $BUILD_DIR/conf/bblayers.conf |
Then source it and bitbake your new layer:
1 | $ DISTRO=fsl-imx-xwayland MACHINE=imx8mmevk source fsl-setup-release.sh -b build-xwayland |
Rebuild your image file
1 | $ bitbake fsl-image-qt5-validation-imx |